Palma Home Design

Friday, November 30, 2012

DIY Upholstered Headboard, with Stenciled Fabric

SO I have a local hardware store where they cut out all of my crazy wood ideas! They only charged me $11 for the wood and cuts to give the Headboard the shape I wanted. Then I used bed topper foam and dacron for the soft upholstered look. I contemplated tufting it, but I knew I was going to use a very busy patterned fabric, so I just got about 4 yards of nailhead trim to go around the edge of it.
 I was having a pretty hard time finding a fabric that I liked (plus a price I liked) for the drapes and headboard, I had already purchased a stencil from Cutting Edge Stencils to do in a nook in the room. I had remembered seeing a couple things on different blogs about stenciling fabric with fabric paint, so I bought some inexpensive fabric in cream, laid it all out and started painting the stencil on!
After I let the fabric dry I cut it out and stretched it onto the wood and foam, and started to staple it on.


After I was done attching the fabric. I spray painted the nailhead trim which was gold to a silver then started hammering it on about 3 inches from the edge. It was my first time using this type of trim and I was worried about the corners that had been cut out and going around them with the trim, but the trim just bent however I wanted it ( it was pretty forgiving) and  turned out much better than I thought!
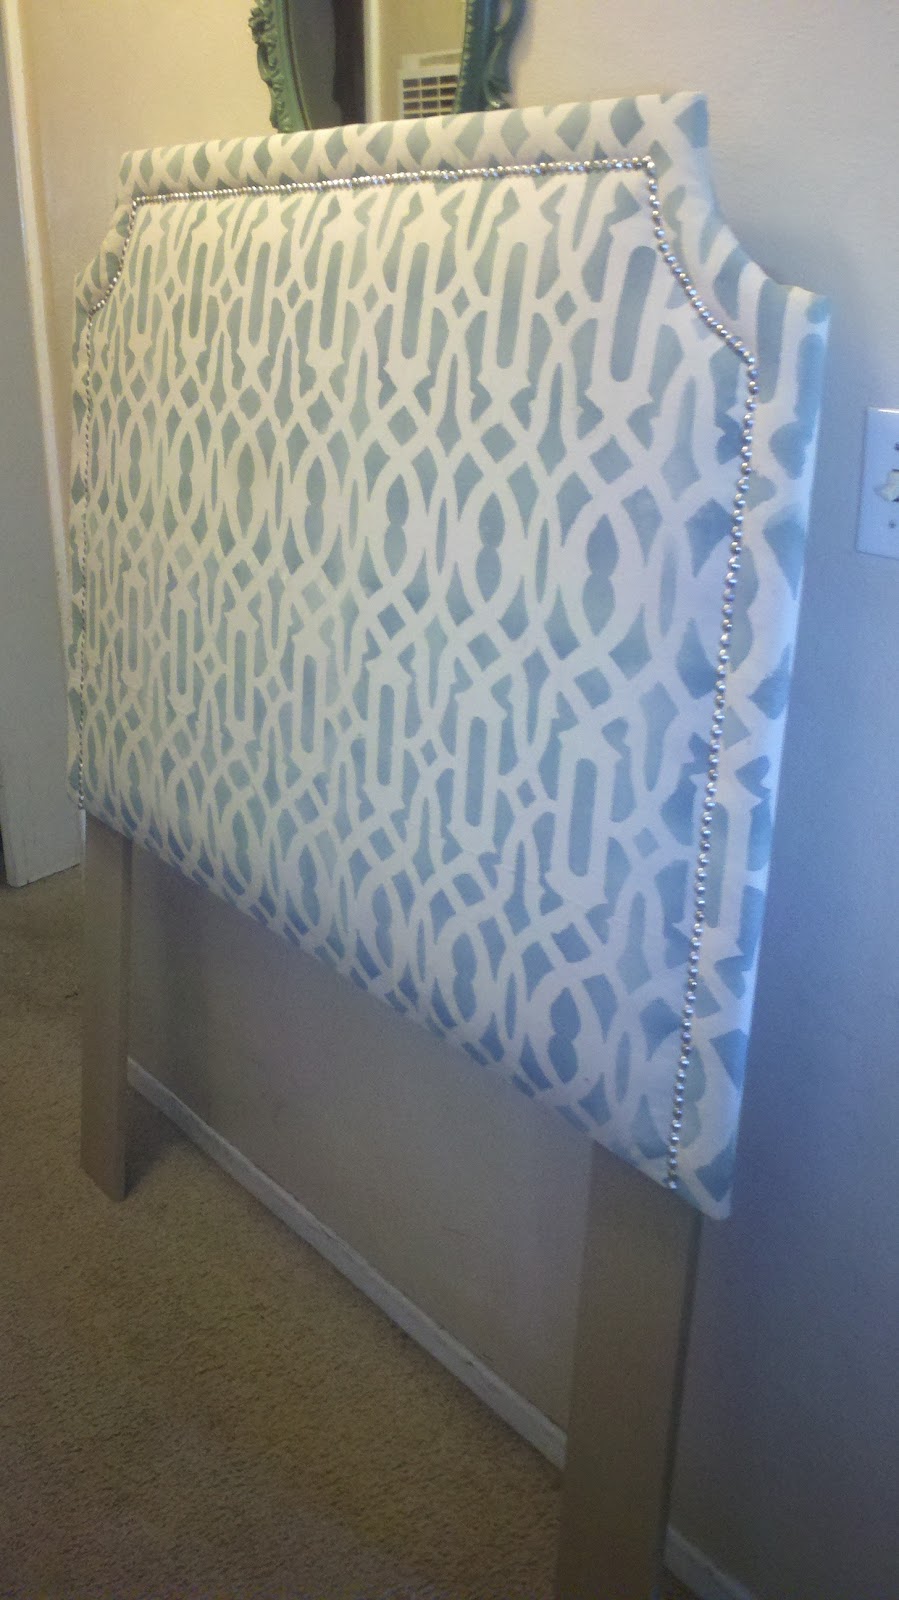
I attached legs and drilled holes at the bottom, so that it could be attached to the metal frame.


 Here is a photo of the finished Headboard and the drapes as well!


Benched!! Update


Again here is the coffee table on the left- showing what it looked like when I picked it up from the thrift store for $10, then had my hubby cut it in half for me, there were cabinet doors on both sides so it gave me 2 identical bench's which I used in 2 different clients homes.
 
One bench got painted blue and one white, the blue base got a very light natural linen for it's diamond tufted cushion top and the white base got a blue fabric diamond tufted cushion top. You can click here to see how I did the tufting.


Friday, September 14, 2012

Say Grace! Dining table Redo!


I have been chomping at the bit to get my OWN house decorated. I recently fell in love with the idea of dinette seating, as our dining room is a pretty condensed area, and we need to be able to seat more than 4 sometimes. I love so many different styles and all the beautiful settee's but ultimately I need to work with what I've got- and this Free dining table & Free cedar chest are what I already had to work with! 
(I know when I get a little more "mula" I will construct a tufted armless settee or something different for my bench so to be continued on that, this is about the table for right now...)

As you can see the table was white and the cedar chest was already dark brown. I decided to paint the top of the chest in aqua and touched up the dark brown on base where needed. Next I painted the top of the table dark distressed brown, and the pedistal my new blue-ish aqua color. (sorry I did not do a step by step photo...I was rushing to get it done & I forgot) Then my next idea was to do something neat and interesting over the top of the brown table top.
 I was thinking about a stencil, then I thought "ooooh" what about writing (like the fabric you see with love letters written in cursive on the fabric, kinda a shabby chic look) Then I had it! Since it's a dining table, and we are a faith-filled family why not a meal time prayer written out?? So I looked online for a nice prayer (rather than just writing "grace" which would have been ok too :)

 I then wrote it out in my own (nice) handwriting with a thin paint brush and the same color paint as the pedestal. It reads, "We give our thanks for food that stays our hunger, for rest that brings us ease, for a home where memories linger, we give thanks for the these. Bless us, oh Lord, and these gifts we are about to receive. Amen"


Tuesday, August 7, 2012

$13 Thrity End Table


So I found this table at my favorite thrift store for $12.95, so I started by sanding down the top to the bare wood. I wanted the base different from the top so I found the perfect color for the base LUCKILY the paint was free as my local hardware store was giving away their newest paint as a promo- which is a primer/paint in one from Clarke & Kensington


Then the next step was to start my stencil in white on the top of table. The stencil is from Cutting Edge Stencils


      The next step was to stain the top over the stencil, I used a dark walnut stain. I love the way my new end table came out!


Thursday, July 5, 2012

Benched! DIY Bench & Diamond Tuft...Thrifty Find $10

This was one of my BEST finds EVER! A 1970ish oversized coffee table for $10 at my favorite thrift store! It was 50"L x 36"d x 16"h. It had 4 cabinet doors on each side with lots of storage AND the really cute funky medallions on each door-which is the MAIN reason I bought it!
So of course I had to figure out something really cool to turn this into....What about 2 benches for the end of a bed? Why not? So I had my hubby saw it in half.


And then there were 2! I started with the first one and painted it white, plus we added on a back so it would be a true storage bench.                   I LOVE the medalions!


Next I had the hubby cut out a piece of wood that I could upholster, then attach to the top of the bench. I also drilled holes to create my diamond pattern for my tufting.


 I then added the foam and dacron. I have seen several DIY tips for creating the holes in the foam and the drill was not working for me, so I just used my turkey carver for the holes as well as for cutting it to size.I then draped the fabric generously over the foam, and started to push it through the holes.


I took a needle and heavy duty fishing line and sewed through the fabric that was coming through the hole, then pulled tightly and stapled it to the wood


The diamond pattern starts to form automatically but you do need to help the "flaps" form in the direction you want them to lay.


I then attached it to the top of the bench from underneath by pre-drilling and using heavy duty screws. I added a contrasting piping and buttons and voila a beautiful bench for the foot of a lovely bed! Stay tuned for after photos of the clients room it will be going into!


Here's the bench in the finished client's room